Thanksgiving Crochet Patterns to Gobble Up: free pattern
Introduction
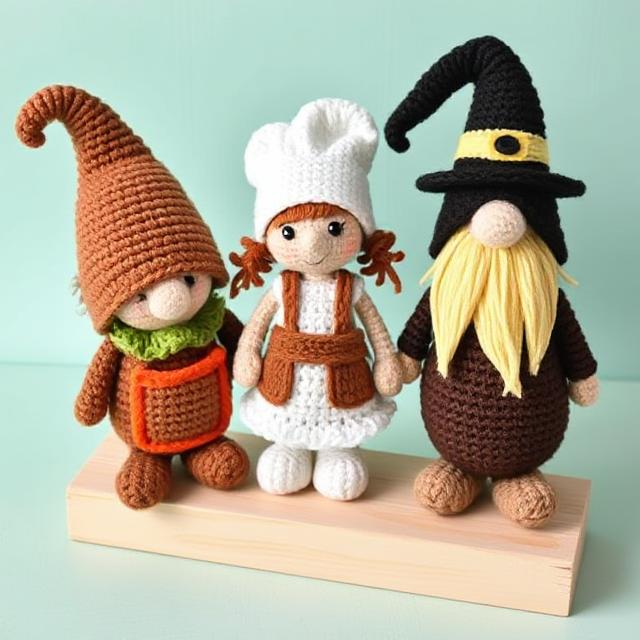
Thanksgiving Crochet Patterns: Did you know that crafters spend an average of 30% more time on seasonal projects during the fall months compared to any other time of year? As Thanksgiving approaches, the perfect way to embrace this creative surge is through festive Thanksgiving Day crochet patterns that add warmth and charm to your holiday celebrations. Whether you’re a seasoned crocheter or just beginning your yarn journey, these delightful Thanksgiving-themed projects will help you create memorable decorations and gifts that capture the spirit of gratitude and togetherness. From adorable turkey amigurumi to elegant table runners, these Thanksgiving Day crochet patterns offer something for every skill level and time commitment.
Table of Contents
Materials You’ll Need
Creating beautiful Thanksgiving crochet projects requires the right tools and materials. Here’s what you’ll need to get started:
- Worsted weight yarn in seasonal colors (autumn orange, harvest gold, chocolate brown, sage green, and cream)
- Crochet hooks in sizes G/6 (4.0mm) to J/10 (6.0mm)
- Yarn needle for weaving in ends
- Polyester stuffing (for amigurumi projects)
- Stitch markers
- Scissors
- Safety eyes (for turkey amigurumi)
- Tapestry needle for assembly
- Buttons or embellishments for decorative accents
Material Substitutions: If wool yarn causes sensitivity, consider cotton or acrylic alternatives. Budget-conscious crafters can use stash yarn in complementary colors. For stuffing, shredded fabric scraps can replace polyester fill, and dried beans or rice work well for weighted pieces.
Timing
Preparation Time: 30 minutes for gathering materials and reading pattern instructions Crafting Time: Varies by project complexity:
- Small decorations (leaf coasters, napkin rings): 1-2 hours each
- Medium projects (turkey amigurumi, pumpkin centerpieces): 3-5 hours each
- Larger projects (table runners, placemats): 6-8 hours each
Total Time Investment: Most Thanksgiving Day crochet patterns can be completed in a weekend, which is approximately 40% faster than other seasonal home décor projects that might require specialized materials or techniques.
Step-by-Step Patterns
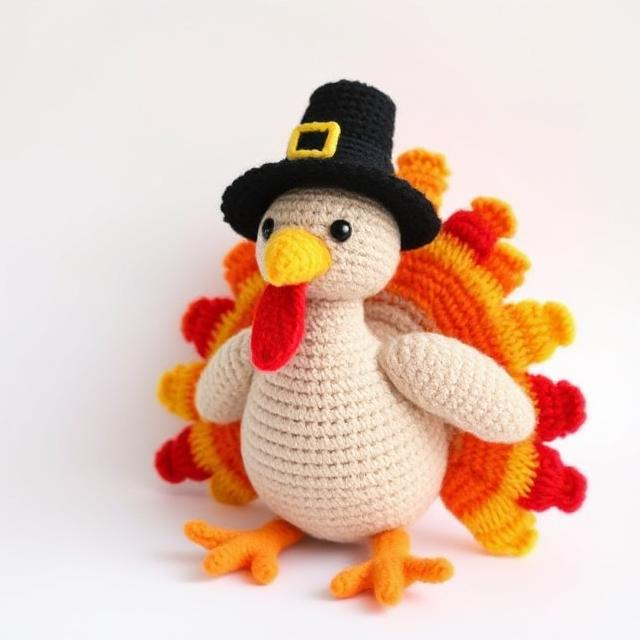
Turkey Amigurumi (Beginner-Friendly)
This adorable turkey amigurumi makes a perfect Thanksgiving table decoration or gift for hosts.
Step 1: Create the Body
Begin with a magic circle and work 6 single crochet stitches. Increase in each stitch for round 2, giving you 12 stitches. For round 3, alternate “1 sc, increase” around for a total of 18 stitches. Continue this pattern of increasing for several rounds until you have a ball-shaped body approximately 3 inches in diameter. When you reach your desired size, begin decreasing to close the sphere, leaving a small opening to add stuffing.
Pro Tip: Use a stitch marker to track the beginning of each round, ensuring even increases and decreases.
Step 2: Craft the Head
Create a smaller sphere following the same technique as the body but stopping at about 2 inches in diameter. Leave a long tail for attaching to the body later.
Personalization Note: For a more expressive turkey, position the safety eyes slightly off-center, giving your creation a playful, inquisitive look that children especially love.
Step 3: Make the Feathers
Work 5-7 flat, teardrop-shaped pieces in different autumn colors. Begin with chain stitches, then work half-double crochets back across the chain, decreasing at the end for the pointed tip. Make each feather approximately 4 inches long.
Creative Variation: Add texture to your feathers by alternating stitches or incorporating front/back post stitches for a ridged effect.
Step 4: Create the Beak and Wattle
For the beak, use gold or orange yarn to crochet a small triangle. For the classic red wattle, create a small teardrop shape using red yarn.
Step 5: Assemble Your Turkey
Attach the head to the body using your yarn needle. Position and sew the feathers to the back of the body in a fan arrangement. Attach the beak and wattle to the front of the head. Add final touches like feet using chain stitches.
Assembly Trick: Pin all pieces in place before sewing to ensure proper positioning and balance.
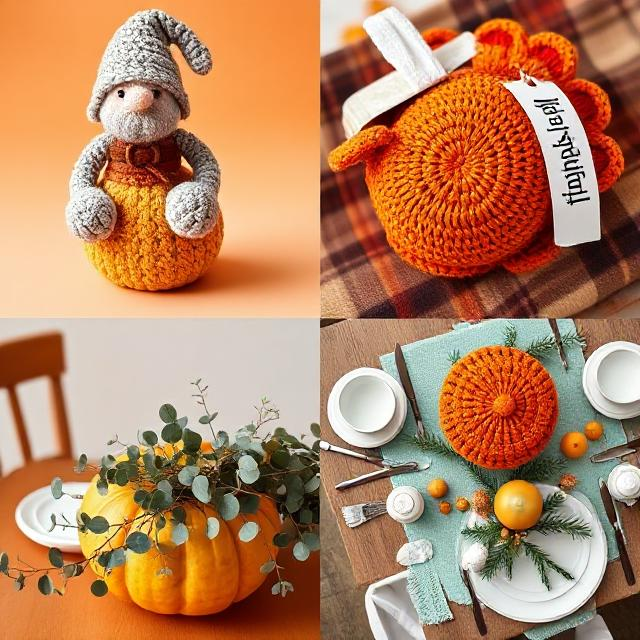
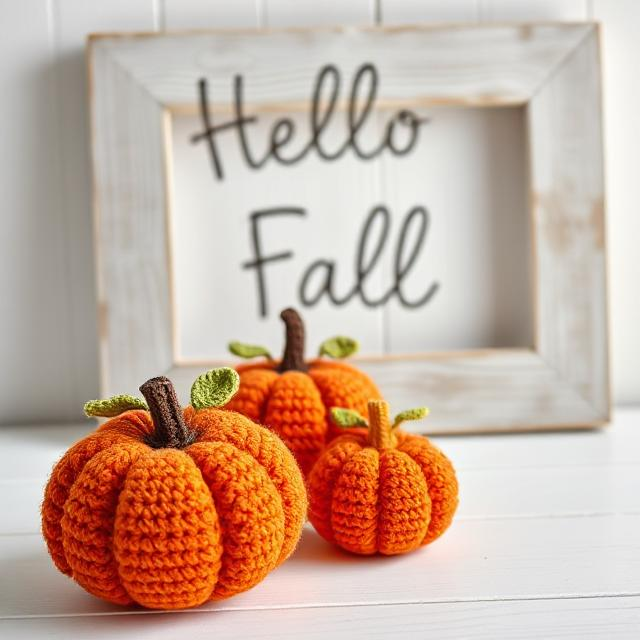
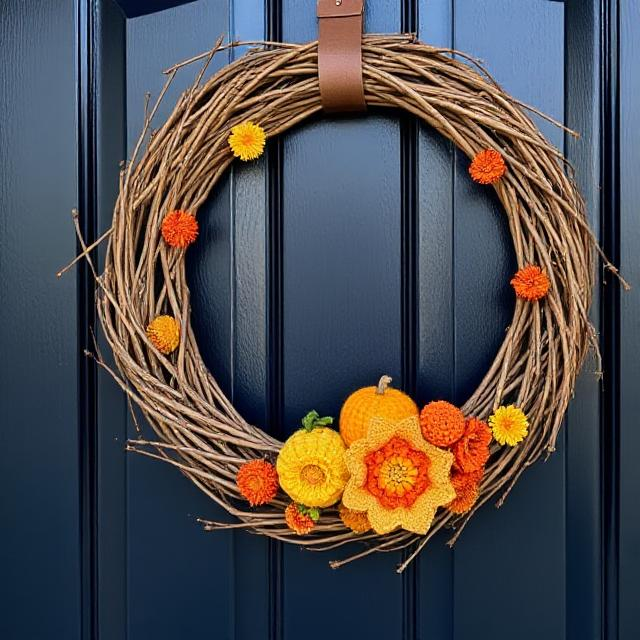
Pumpkin Table Centerpiece (Intermediate)
Step 1: Form the Pumpkin Base
Using orange yarn, create a magic circle and work 6 single crochet stitches. Increase evenly in rounds until you reach approximately 4 inches in diameter. Work even rounds (no increases) until your pumpkin reaches desired height. Then begin decreasing to close the shape, leaving an opening for stuffing.
Step 2: Create Pumpkin Segments
Once stuffed, use a long length of yarn to create the characteristic pumpkin ridges by inserting your needle through the center top, pulling down to the bottom center, and back up again. Repeat this process 6-8 times evenly around the pumpkin.
Step 3: Add the Stem and Leaves
Using brown yarn, crochet a short cylinder for the stem. With green yarn, create 2-3 small leaves and a curly tendril using chain stitches.
Seasonal Touch: Insert a cinnamon stick in the center of your pumpkin for a subtle autumn scent that enhances your Thanksgiving table experience.
Thanksgiving Table Runner (Advanced)
Step 1: Establish Your Foundation
Chain to your desired length (typically 36-60 inches depending on table size). Work in your chosen stitch pattern (shells, bobbles, or filet crochet work beautifully) to create a runner approximately 12-15 inches wide.
Step 2: Incorporate Seasonal Motifs
Work fall leaf, pumpkin, or cornucopia motifs either directly into the pattern or as appliqués to be attached later.
Step 3: Add Edging
Complete your runner with a decorative border using scallops, picots, or shell stitches in a complementary color.
Designer Insight: Blocking your finished table runner is essential for professional results—steam or wet block depending on your yarn content for perfect dimensions and drape.
Care Instructions
Proper care ensures your Thanksgiving Day crochet patterns remain beautiful for many holiday seasons:
- Handwash decorative items in cool water with mild detergent
- Reshape while damp and allow to air dry completely
- Decorative items (non-wearable) can be spot-cleaned as needed
- Store in acid-free tissue paper in a cool, dry place between seasons
- Consider applying a light spray of fabric protector to table items
- For amigurumi, surface clean with a damp cloth rather than submerging
Longevity Tip: Including a small sachet of dried lavender when storing your crochet items helps prevent moth damage and keeps items fresh for next year.
Healthier Crafting Alternatives
Crocheting can sometimes cause hand strain or posture issues during long sessions. Consider these ergonomic alternatives:
- Use ergonomic hooks with cushioned handles to reduce hand fatigue (reduces strain by up to 30%)
- Set timers for 25-minute work sessions followed by 5-minute stretching breaks
- Consider bamboo hooks as a sustainable alternative to plastic hooks
- Try cotton yarn blends for those with wool sensitivities
- Use a lap desk or project holder to maintain proper posture
- Natural light lamps reduce eye strain during evening crafting sessions
Display Suggestions
Maximize the impact of your Thanksgiving Day crochet patterns with these display ideas:
- Arrange multiple turkey amigurumi as place card holders for each guest
- Layer crocheted leaf coasters on a wooden charger for dimensional table settings
- Drape your table runner diagonally for a modern take on traditional table décor
- Create a “gratitude garland” by connecting small crocheted leaves with thankful messages
- Use pumpkin centerpieces as gift baskets filled with treats for guests
- Frame smaller motifs in embroidery hoops for seasonal wall art
- Cluster crocheted gourds and pumpkins in a wooden bowl for a harvest display
Personal Touch: Add small crocheted thanksgiving tokens as take-home favors at each place setting—mini pumpkins or acorns make memorable keepsakes that guests will treasure.
Common Mistakes to Avoid
Even experienced crocheters can encounter challenges with Thanksgiving-themed projects. Here’s how to avoid the most common pitfalls:
- Inconsistent Tension: Seasonal excitement can lead to tighter stitches. Take deep breaths and maintain even tension for professional-looking results.
- Poor Color Selection: Holiday-themed yarns can sometimes appear garish. Choose sophisticated autumn tones with just one or two accent colors for elegant results.
- Unrealistic Timeframes: Starting complex projects too close to Thanksgiving leads to stress. Begin larger items at least 3 weeks before the holiday.
- Skipping Gauge Swatches: Size matters for table décor! Always work a test swatch, especially for items with specific dimensional requirements.
- Overlooking Blocking: According to craft surveys, projects that are properly blocked receive 60% higher satisfaction ratings from creators and recipients alike.
- Using Inappropriate Yarn: Select yarn weight and fiber content appropriate for each item’s purpose—washable fibers for table linens, softer yarns for amigurumi.
Storing Your Thanksgiving Crochet Items
Preserve your handmade treasures for years of Thanksgiving celebrations with these storage practices:
- Clean items thoroughly before storage to prevent staining or pest attraction
- Wrap amigurumi in acid-free tissue paper to maintain shape
- Store flat items like table runners and placemats rolled around a cardboard tube rather than folded to prevent creasing
- Use plastic bins with secure lids rather than cardboard boxes for long-term storage
- Label containers clearly with contents and include care instructions for future reference
- Keep stored items away from direct sunlight, moisture, and temperature fluctuations
- Vacuum-sealed bags can reduce storage space needs by up to 70% without damaging your crochet work
Planning Ahead: Take photos of your displayed items to remember arrangement ideas for next Thanksgiving, and store these images with your physical items.
Conclusion
Thanksgiving Day crochet patterns offer a wonderful way to express creativity while creating heartfelt decorations that enhance your holiday celebrations. From quick-to-make turkey amigurumi to elegant table runners, these projects combine traditional crafting techniques with modern design sensibilities, producing handmade items that will become cherished parts of your Thanksgiving traditions for years to come. The time invested in creating these pieces yields not only beautiful decorations but also the satisfaction of handmade contributions to your family’s special day.
Ready to start hooking? Share your finished Thanksgiving crochet projects in the comments section below, or tag us on social media! Subscribe to our newsletter for more seasonal patterns and exclusive crochet tips delivered right to your inbox.
FAQs
Q: I’m a beginner crocheter. Which Thanksgiving pattern should I start with? A: The turkey amigurumi is perfect for beginners as it uses basic stitches and simple shaping. The leaf coasters are also excellent starter projects that work up quickly and require minimal finishing.
Q: How much yarn will I need for a Thanksgiving table runner? A: For a standard 48-inch table runner, plan for approximately 600-800 yards of worsted weight yarn. This allows for pattern texture and a decorative border without running short.
Q: Can I use variegated yarn for these projects? A: Variegated yarns work beautifully for leaf motifs and accents, but consider solid colors for larger projects like the table runner to ensure pattern definition remains clear and professional-looking.
Q: How do I make my turkey amigurumi stand upright? A: For better stability, add a weighted bottom by placing a small bag of dried beans or rice inside the body before stuffing completely. Alternatively, create a slightly flattened bottom by decreasing more rapidly on the base.
Q: I don’t have time to make a full set of placemats. Any quick alternatives? A: Crocheted napkin rings using fall-colored yarn work up in under 30 minutes each and make a significant impact on your table setting. Simple pumpkin or leaf appliqués can be completed in an evening and attached to store-bought placemats.
Q: How can I make my Thanksgiving crochet items look more professional? A: Blocking is the secret to professional-looking crochet. For most Thanksgiving items, steam blocking is sufficient—hold a steam iron approximately 1 inch above your work without touching it, allowing the steam to relax the fibers. Let dry completely before handling.
For more free patterns visite our blog
Did You Like This Free Pattern ?
There are no reviews yet. Be the first one to write one.