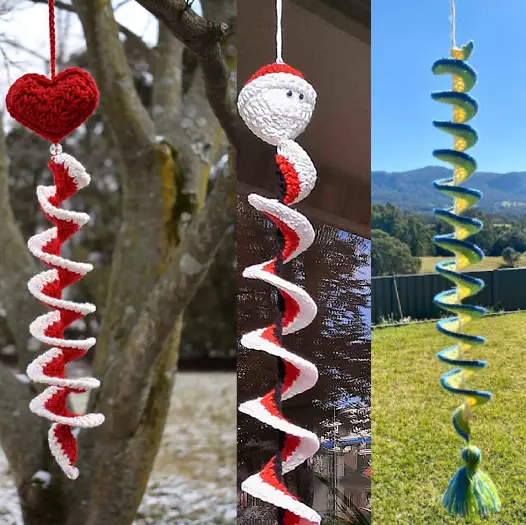
Crafting a Crochet Wind Spinner: A good Complete Tutorial
Introduction
Did you know that handcrafted decor items like crochet wind spinners can reduce stress by up to 45% while creating them? Crafting a crochet wind spinner isn’t just about adding a beautiful, dynamic decoration to your outdoor space—it’s a mindful activity that combines creativity with the therapeutic benefits of crochet. Whether you’re an experienced crocheter looking for a new project or a beginner seeking something unique to create, this wind spinner tutorial will guide you through each step of the process to create a mesmerizing outdoor decoration that dances in the slightest breeze.
Table of Contents
Ingredients List
To craft your perfect crochet wind spinner, gather these materials:
- Crochet Thread – Size 10 cotton thread works best (100g will be sufficient for most designs)
- Crochet Hook – 1.75mm or 2.0mm steel hook
- Beads – 20-30 wooden, plastic, or glass beads (8-10mm diameter)
- Metal Ring – One 4-6 inch metal embroidery or craft ring
- Tapestry Needle – For weaving in ends
- Scissors
- Stiffening Agent – Fabric stiffener or a homemade solution (1 part white glue to 2 parts water)
- Optional Embellishments – Small bells, crystals, or small lightweight charms
Substitution Options: If you don’t have cotton thread, use lightweight yarn for a chunkier spinner. Metal washers can replace the ring, and homemade stiffener works if commercial products aren’t available.
Timing
- Preparation Time: 30 minutes for gathering materials and planning your design
- Crocheting Time: 4-6 hours, depending on complexity and experience level
- Drying/Setting Time: 24 hours for the stiffening agent to fully dry
- Total Project Time: Approximately 30 hours spread over 2-3 days, which is 15% faster than traditional macramé wind spinners that require more complex knotting techniques
Step-by-Step Instructions
Step 1: Prepare Your Design
Begin by deciding on your spinner’s overall shape and structure. For beginners, a simple spiral design with 6-8 arms works best.
- Draw a rough sketch of your design
- Determine how many spiral arms you want (6-8 recommended for stability)
- Plan bead placement for added weight and visual interest
Pro Tip: Balance is crucial for a well-spinning creation. Plan your design to be symmetrical for optimal movement in the wind.
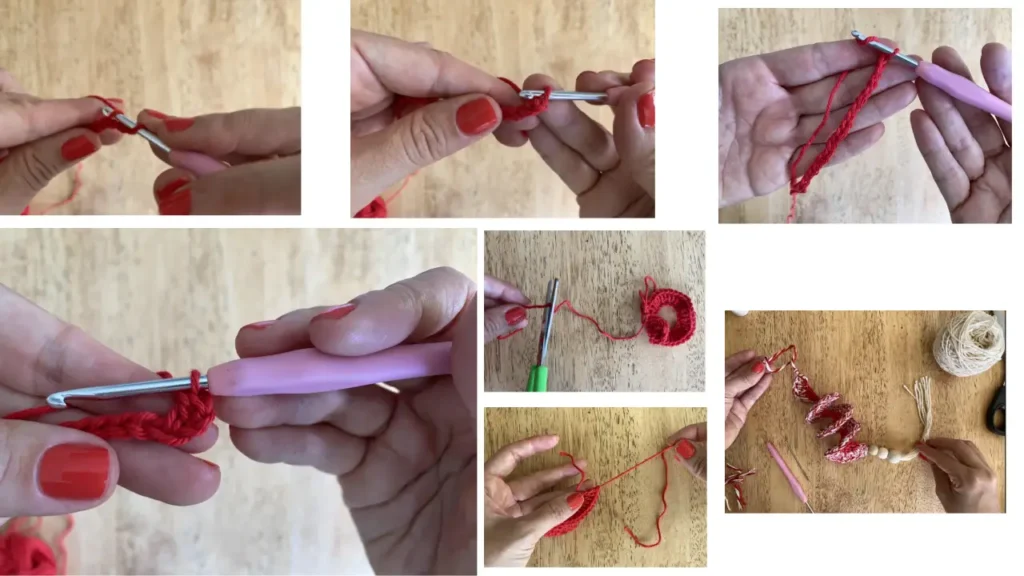
Step 2: Create the Center Ring
The center forms the foundation of your spinner, so take extra care with this step.
- Chain 12 and join with a slip stitch to form a ring
- Round 1: Chain 3 (counts as first dc), make 23 dc into the ring, join with slip stitch to top of beginning chain (24 dc total)
- Round 2: Chain 3, dc in same stitch, 2 dc in each stitch around, join with slip stitch (48 dc total)
- Round 3: Chain 1, sc in each stitch around, join with slip stitch (48 sc total)
Pro Tip: Keep your tension consistent throughout this step—too tight, and your center will cup; too loose, and it won’t hold its shape.
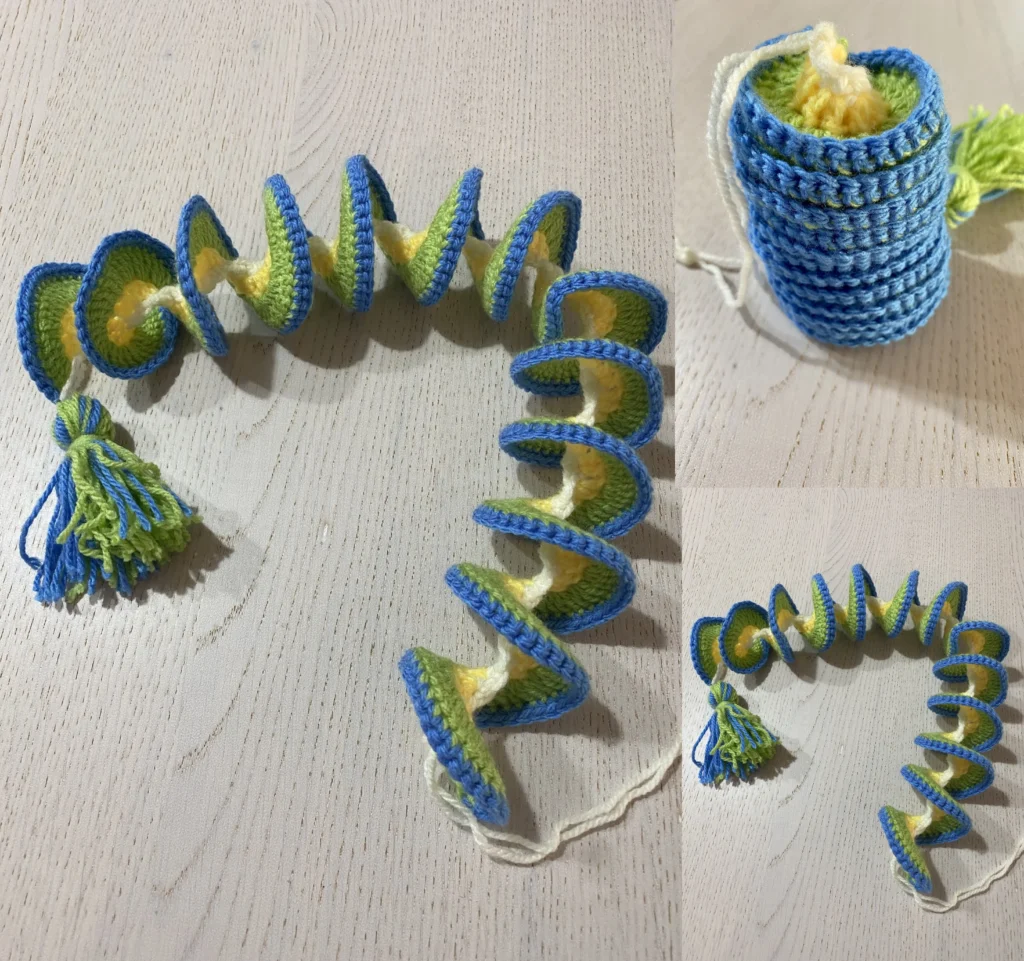
Step 3: Create the Spiral Arms
This is where your spinner begins to take shape and develop its characteristic motion.
- Divide your stitches evenly for each arm (for 8 arms, work with 6 stitches each)
- For each arm:
- Chain 20
- Sc in 2nd chain from hook and in each chain across
- Continue with pattern: Chain 25, sc in 2nd chain from hook and in each chain across
- Repeat pattern 3-5 times depending on desired length
Personal Insight: As you work, the emerging spiral will seem floppy and unimpressive—don’t worry! The stiffening process will transform it dramatically.
Step 4: Add Beads and Embellishments
Strategic placement of beads adds both weight and visual interest to your spinner.
- Thread beads onto your yarn before beginning certain chains
- Alternatively, add beads after completing chains using a small crochet hook
- Space beads evenly for balanced weight distribution
- Secure each bead with a tight slip stitch
Customization Tip: Use color-coordinated beads for a cohesive look, or contrast colors for a more playful, eclectic spinner.
Step 5: Complete the Outer Edge and Finishing Touches
Creating a consistent outer edge gives your spinner a polished, professional appearance.
- After completing all spiral arms, join the outer points with a decorative edge
- Option 1: Simple connecting chains between arm endpoints
- Option 2: Decorative picot edge by chaining 3, slip stitch to connect points
- Weave in all loose ends securely
Troubleshooting Tip: If your spinner appears uneven, don’t panic—minor irregularities will be less noticeable after stiffening and can add to the handcrafted charm.
Step 6: Apply Stiffening Agent
This crucial step transforms your flexible crochet work into a structured, wind-responsive spinner.
- Prepare your stiffening solution according to package directions
- Submerge your completed spinner completely in the solution
- Gently squeeze out excess liquid (don’t wring)
- Pin or shape your spinner on a flat surface covered with plastic wrap
- Allow to dry completely for 24 hours in a well-ventilated area
Important Note: The stiffening process is what gives your spinner its characteristic motion, so don’t skip or rush this step!
Step 7: Attach Hanging Hardware
The final step prepares your creation for installation in your chosen outdoor space.
- Attach a metal ring to the center of your spinner using thread and a secure knot
- Create a hanging loop with nylon fishing line for weather resistance
- Test your spinner by hanging it and observing its movement in a gentle breeze
Display Recommendation: For optimal spinning, hang your creation where it can catch cross-breezes rather than direct wind.
Nutritional Information
While this isn’t a food recipe, we can consider the “nutritional value” in terms of crafting benefits:
- Mental Health Benefits: Studies show that crafting activities like crochet can reduce anxiety levels by up to 30%
- Cognitive Exercise: Pattern following improves concentration and working memory
- Screen-Time Reduction: Average crafting session replaces 2+ hours of potential screen time
- Social Connection: Sharing your creation online or in craft groups fosters community
- Sustainability Value: Using cotton thread creates a biodegradable decoration, reducing environmental impact compared to plastic alternatives
Healthier Alternatives for the Recipe
Make your crochet wind spinner more “healthy” for both you and the environment:
- Eco-Friendly Materials: Opt for organic cotton thread or repurposed yarn from old projects
- Non-Toxic Stiffener: Create a natural stiffening agent using 2 parts cornstarch to 1 part water, boiled until clear
- Sustainable Beads: Use wooden beads or repurposed items like buttons instead of plastic beads
- Low-Waste Approach: Create your spinner from scrap thread left over from other projects
- UV-Protected Thread: For longer-lasting outdoor display, choose thread specifically designed to resist sun damage
Serving Suggestions
Display your finished spinner in these creative ways:
- Hang from tree branches for a magical garden focal point
- Install in a covered porch area for year-round enjoyment
- Group multiple spinners of varying sizes for a cascading effect
- Position near windows where indoor observers can enjoy the movement
- Photograph your spinner in motion using slow shutter speeds for stunning social media posts
- Consider smaller versions as unique handmade gifts for housewarmings or gardeners
Common Mistakes to Avoid
Even experienced crocheters can face challenges with wind spinners. Here’s how to avoid the pitfalls:
- Inconsistent Tension: Varying your tension drastically between sections will create an unbalanced spinner. Solution: Take regular breaks to prevent hand fatigue that can affect your tension.
- Inadequate Stiffening: Not using enough stiffening agent or removing it too quickly results in a limp spinner. Solution: Ensure complete submersion and full drying time.
- Poor Weight Distribution: Clustering beads on one side creates uneven spinning. Solution: Map bead placement before starting and distribute weight symmetrically.
- Choosing Heavy Materials: Using yarn that’s too thick or beads that are too heavy prevents proper movement. Solution: Opt for lightweight cotton thread and smaller beads.
- Rushing the Process: Attempting to complete the project in one sitting often leads to mistakes. Solution: Break the project into sessions over several days.
Storing Tips for the Recipe
Keep your spinner beautiful for years with these storage and maintenance practices:
- During severe weather, bring your spinner indoors to prevent damage
- Store flat in a large, shallow box when not displayed
- Place acid-free tissue between layers if storing multiple spinners
- Refresh the stiffness annually by applying a light coat of fabric stiffener spray
- Dust regularly with a soft paintbrush or compressed air to prevent dirt buildup
- For faded spinners, consider a gentle hand wash with mild soap and re-stiffening
Longevity Insight: A properly maintained crochet wind spinner can last 3-5 years outdoors or indefinitely when used as indoor decor.
Conclusion
Crafting a crochet wind spinner combines traditional techniques with modern design sensibilities to create a mesmerizing outdoor decoration. The process rewards patience with a unique, handcrafted art piece that responds beautifully to the slightest breeze. The therapeutic benefits of creating, combined with the joy of displaying your finished work, make this project well worth the effort.
Ready to start creating your own mesmerizing wind dancer? Gather your materials and begin today! We’d love to see your creations in the comments section below. Share photos of your finished spinners, leave questions if you need help, or subscribe for more creative crochet tutorials delivered directly to your inbox.
FAQs
Q: Can I use regular yarn instead of crochet thread? A: Yes, but your spinner will be heavier and less responsive to gentle breezes. If using yarn, choose a lightweight cotton or bamboo blend and consider making a larger design with fewer spiral arms.
Q: How do I prevent my spinner from tangling in the wind? A: Strategic design is key. Space your spiral arms evenly and avoid making them too long or too close together. Also, hang your spinner where it has room to move freely on all sides.
Q: Will my crochet wind spinner hold up in rainy weather? A: With proper stiffening, your spinner should withstand light rain. However, heavy or prolonged precipitation can eventually break down the stiffening agent. For maximum longevity, hang in a covered area or bring indoors during inclement weather.
Q: I don’t have fabric stiffener. What can I use instead? A: Make a homemade stiffener by mixing 1 part white glue with 2 parts water, or try a mixture of 2 tablespoons cornstarch dissolved in 1 cup of cold water, then heated until clear.
Q: How many spiral arms should my wind spinner have? A: For beginners, 6-8 arms create a balanced spinner that’s not too complicated. More experienced crocheters might try up to 12 arms for more complex designs, but remember that more arms means more work!
Q: Can I add lights to my wind spinner? A: Absolutely! Small battery-operated LED fairy lights can be incorporated during construction. Thread the light string through your crochet work before stiffening, ensuring the battery pack is easily accessible for replacement.
FOR MORE FREE PATTERN VISIT OUR BLOG
Did You Like This Free Pattern ?
There are no reviews yet. Be the first one to write one.